Bidh daingneachadh sgriubha aghaidh a’ phròiseis odontoid a’ gleidheadh gnìomh rothlach C1-2 agus chaidh aithris anns an litreachas gu bheil ìre leaghadh de 88% gu 100% aige.
Ann an 2014, dh’fhoillsich Markus R et al. oideachadh air an dòigh-obrach lannsaichte airson daingneachadh sgriubha anterior airson brisidhean odontoid ann an The Journal of Bone & Joint Surgery (Am). Tha an artaigil a’ toirt cunntas mionaideach air prìomh phuingean an dòigh-obrach lannsaichte, obair leanmhainn às dèidh lannsaireachd, comharran agus ceumannan rabhaidh ann an sia ceumannan.
Tha an t-artaigil a’ cur cuideam air nach eil ach brisidhean seòrsa II freagarrach airson daingneachadh dìreach le sgriubha aghaidh agus gur fheàrr daingneachadh le aon sgriubha falamh.
Ceum 1: Suidheachadh rè obair-lannsa an euslaintich
1. Feumar dealbhan-rèidiografa anteroposterior agus lateral as fheàrr a thogail airson fiosrachadh an obraiche.
2. Feumar an t-euslainteach a chumail le a bheul fosgailte rè na lannsaireachd.
3. Bu chòir an bristeadh ath-shuidheachadh cho mòr 's as urrainn mus tòisich an lannsaireachd.
4. Bu chòir an spine ceirbheacsach a bhith air a shìneadh cho mòr 's as urrainn gus am bi bonn a' phròiseis odontoid air a nochdadh gu h-iomchaidh.
5. Mura h-eil e comasach hyperextension a dhèanamh air an spine ceirbheacsach – me, ann am brisidhean hyperextension le gluasad posterior ceann cephalad a’ phròiseis odontoid – faodar beachdachadh air ceann an euslaintich a thionndadh an taobh eile an coimeas ris a’ stoc aige no aice.
6. ceann an euslaintich a chumail cho seasmhach 's as urrainn. Bidh na h-ùghdaran a' cleachdadh frèam-cinn Mayfield (air a shealltainn ann am Figearan 1 agus 2).
Ceum 2: Dòigh-obrach lannsaichte
Bithear a’ cleachdadh dòigh-obrach lannsaichte àbhaisteach gus an còmhdach tracheal aghaidh fhoillseachadh gun mhilleadh a dhèanamh air structaran anatomical cudromach sam bith.
Ceum 3: Puing inntrigidh sgriubha
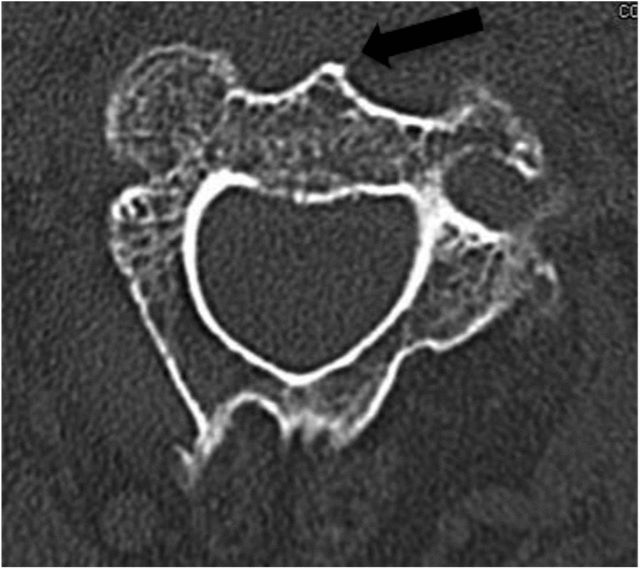
Tha am puing inntrigidh as fheàrr suidhichte aig oir ìochdarach anterior bonn bodhaig vertebral C2. Mar sin, feumar oir aghaidh an diosc C2-C3 a nochdadh. (mar a chithear ann am Figearan 3 agus 4 gu h-ìosal) Figear 3
Tha an t-saighead dhubh ann am Figear 4 a’ sealltainn gu bheilear a’ coimhead gu faiceallach air an spine C2 anterior nuair a thathar a’ leughadh film CT aiseach ro-lannsaireachd agus gum feumar a chleachdadh mar chomharra-tìre ana-eòlach airson a bhith a’ dearbhadh càite a bheil an t-snàthad air a chur a-steach rè lannsaireachd.
2. Dearbhaich a’ phuing inntrigidh fo sheallaidhean fluoroscopach anteroposterior agus lateral den spine ceirbheacsach. 3.
3. Sleamhnaich an t-snàthad eadar oir uachdarach aghaidh a’ phlàta-deiridh àrd C3 agus puing inntrigidh C2 gus am puing inntrigidh sgriubha as fheàrr a lorg.
Ceum 4: Suidheachadh sgriubha
1. Cuirtear snàthad GROB le trast-thomhas de 1.8 mm a-steach an toiseach mar stiùireadh, leis an t-snàthad beagan air cùl bàrr an notochord. Às dèidh sin, cuirtear sgriubha falamh le trast-thomhas de 3.5 mm no 4 mm a-steach. Bu chòir an t-snàthad a bhith air a gluasad air adhart gu slaodach cephalad an-còmhnaidh fo sgrùdadh fluoroscopach anteroposterior agus lateral.
2. Cuir an drile falamh ann an taobh a’ phrìne treòrachaidh fo sgrùdadh fluoroscopach agus gluais air adhart e mean air mhean gus an tèid e tron bhriseadh. Cha bu chòir don drile falamh dol a-steach do cortex taobh cephalad an notochord gus nach tèid am prìne treòrachaidh a-mach leis an drile falamh.
3. Tomhais fad an sgriubha fhalamh a tha a dhìth agus dearbhaich e leis an tomhas CT ro-obrachaidh gus mearachdan a sheachnadh. Thoir an aire gum feum an sgriubha fhalamh dol a-steach don chnàimh cortical aig bàrr a’ phròiseis odontoid (gus an ath cheum de dhlùthadh ceann a’ bhristeadh a dhèanamh nas fhasa).
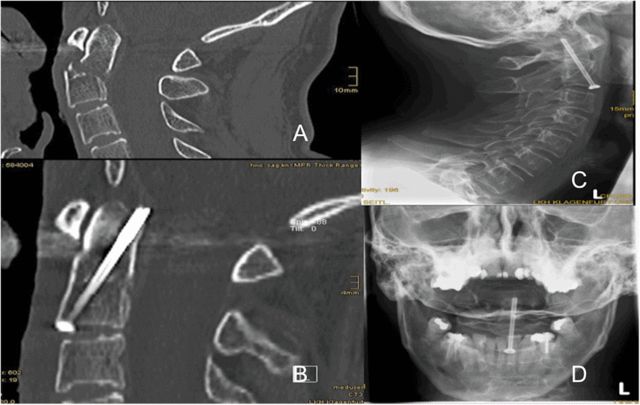
Anns a’ mhòr-chuid de chùisean nan ùghdaran, chaidh aon sgriubha falamh a chleachdadh airson a dhaingneachadh, mar a chithear ann am Figear 5, a tha suidhichte gu meadhanach aig bonn a’ phròiseis odontoid mu choinneamh na cephalad, le bàrr an sgriubha dìreach a’ dol a-steach don chnàimh cortical posterior aig bàrr a’ phròiseis odontoid. Carson a thathas a’ moladh aon sgriubha? Cho-dhùin na h-ùghdaran gum biodh e duilich puing inntrigidh iomchaidh a lorg aig bonn a’ phròiseis odontoid nan cuireadh iad dà sgriubha fa leth 5 mm bho mheadhan-loidhne C2.
Tha Figear 5 a’ sealltainn sgriubha falamh suidhichte gu meadhanach aig bonn a’ phròiseis odontoid mu choinneamh na cephalad, le bàrr an sgriubha dìreach a’ dol a-steach do cortex a’ chnàimh dìreach air cùl bàrr a’ phròiseis odontoid.
Ach a bharrachd air an fhactar sàbhailteachd, an àrdaich dà sgriubha seasmhachd às dèidh obair-lannsa?
Sheall sgrùdadh bith-mheacanaigeach a chaidh fhoillseachadh ann an 2012 anns an iris Clinical Orthopedics and Related Research le Gang Feng et al. bho Cholaiste Rìoghail Lannsairean na Rìoghachd Aonaichte gu bheil aon sgriubha agus dà sgriubha a’ toirt seachad an aon ìre de sheasmhachd ann a bhith a’ daingneachadh brisidhean odontoid. Mar sin, tha aon sgriubha gu leòr.
4. Nuair a thèid suidheachadh a’ bhriste agus nam prìnichean treòrachaidh a dhearbhadh, thèid na sgriothan falamh iomchaidh a chur nan àite. Bu chòir suidheachadh nan sgriothan agus nam prìnichean a choimhead fo fluoroscopy.
5. Bu chòir a bhith faiceallach nach bi an inneal sgriubhaidh a’ toirt buaidh air na figheagan bog mun cuairt nuair a thathar a’ dèanamh gin de na h-obrachaidhean gu h-àrd. 6. Teannaich na sgriubhaichean gus cuideam a chuir air an àite briste.
Ceum 5: Dùnadh Leòintean
1. Sruthlaich an raon lannsaireachd an dèidh dhut crìoch a chur air cur an sgriubha.
2. Tha haemostasis mionaideach riatanach gus duilgheadasan às dèidh obair-lannsa leithid teannachadh haematoma an trachea a lughdachadh.
3. Feumar am fèith latissimus dorsi ceirbheacsach a chaidh a ghearradh a dhùnadh ann an co-thaobhadh mionaideach air neo thèid bòidhchead an sgar às dèidh an obrachaidh a chuir an cunnart.
4. Chan eil feum air dùnadh iomlan nan sreathan domhainn.
5. Chan eil drèanadh lotan na roghainn riatanach (mar as trice cha bhith ùghdaran a’ cur drèanaichean às dèidh obair-lannsa).
6. Thathar a’ moladh fuaigheal intradermal gus a’ bhuaidh air coltas an euslaintich a lughdachadh.
Ceum 6: Leantainn suas
1. Bu chòir do dh’euslaintich cumail orra a’ caitheamh brace amhaich teann airson 6 seachdainean às dèidh an obrachaidh, mura h-eil feum air le cùram altraim, agus bu chòir measadh a dhèanamh orra le ìomhaighean às dèidh an obrachaidh bho àm gu àm.
2. Bu chòir dealbhan-rèidio àbhaisteach anteroposterior agus lateral den spine ceirbheacsail ath-sgrùdadh aig 2, 6, agus 12 seachdainean agus aig 6 agus 12 mìosan an dèidh lannsaireachd. Rinneadh scan CT aig 12 seachdainean an dèidh lannsaireachd.
Àm puist: Dùbhlachd-07-2023


